
本文根据 GitHub 官方文档《Installing the GitHub Copilot extension in your environment》(JetBrains 部分)和《Using agent mode in your IDE》整理,资料核对于 2026-10-11。
适用于谁
- 用 IntelliJ IDEA、PyCharm、WebStorm、GoLand 等 JetBrains IDE,不想换编辑器的人;
- 搜「idea 安装 github copilot」「github copilot idea 使用」「github copilot idea agent mode」的人。
结论先说
- 在 IDE 的 Plugins → Marketplace 里搜 GitHub Copilot 安装,重启 IDE。
- 登录入口:Tools → GitHub Copilot → Login to GitHub,用设备码在浏览器里授权。
- JetBrains 里同样有 Chat 和 Agent 模式:点 Copilot 图标打开聊天面板,在顶部切到 Agent 标签。
- 聊天和 Agent 消耗 AI credits;官方建议 JetBrains 插件版本不低于 1.9.1,否则用量信息可能显示不准。
- 没有 Copilot 订阅可以先用 Copilot Free。
支持哪些 IDE
官方列出的兼容名单:IntelliJ IDEA(Ultimate、Community、Educational)、Android Studio、CLion、DataGrip、DataSpell、GoLand、MPS、PhpStorm、PyCharm(Professional、Community、Educational)、Rider、RubyMine、RustRover、WebStorm,以及 Code With Me Guest 和 JetBrains Client。
具体到「哪个插件版本配哪个 IDE 版本」,官方让你看 JetBrains Marketplace 上 GitHub Copilot 插件的 Versions 页。IDE 太旧时,Marketplace 里会搜不到或提示不兼容,先升级 IDE。
步骤一:安装插件
- 确认账号能用 Copilot(付费订阅、组织分配的席位,或 Copilot Free);
- 打开 IDE 的设置,进入 Plugins,在 Marketplace 里搜索
GitHub Copilot,点 Install; - 安装完成后点 Restart IDE。
官方文档顺带说明:这个插件的许可方是 GitHub 而不是 JetBrains,使用即表示同意 GitHub 的附加产品条款。
步骤二:登录 GitHub
- 重启后点菜单 Tools → GitHub Copilot → Login to GitHub;
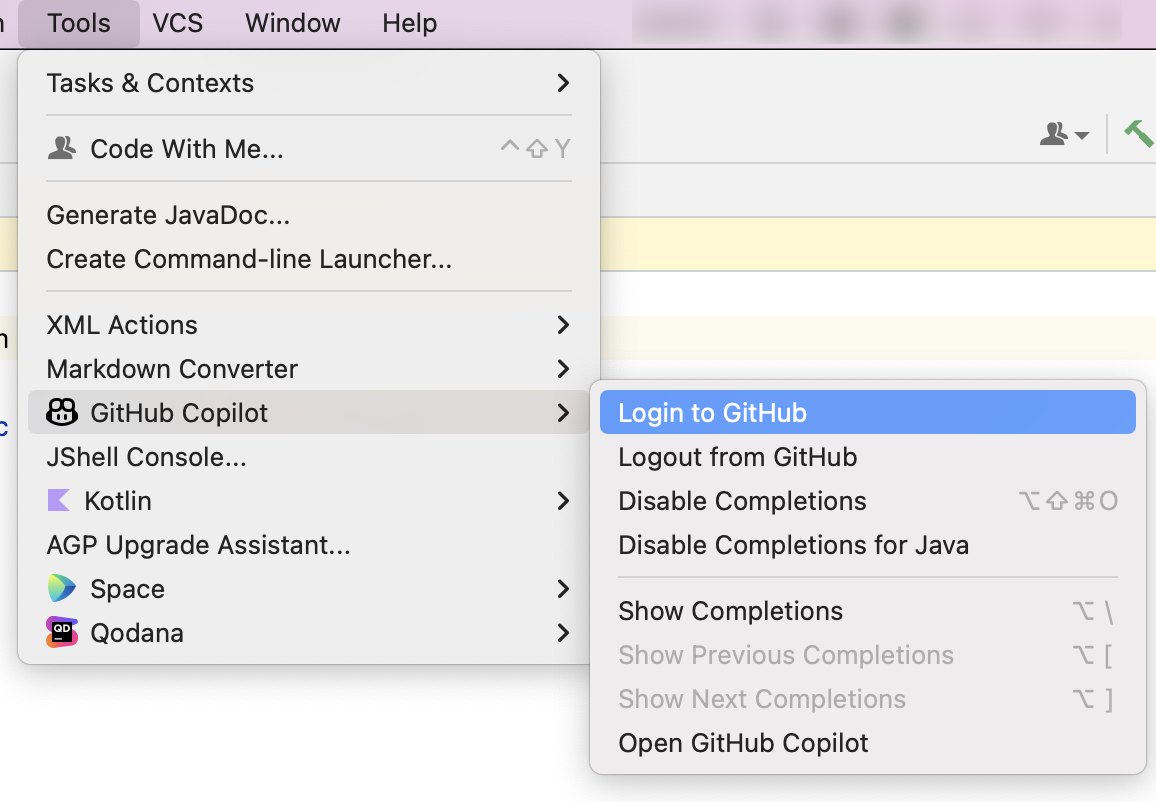
图片来源:GitHub 官方文档《Installing the GitHub Copilot extension in your environment》
- 在弹出的 Sign in to GitHub 对话框里点 Copy and Open——它会复制一串设备码并打开浏览器;
- 浏览器里如果要求登录,就登录你的 GitHub 账号;
- 粘贴设备码,点 Continue;
- 在权限确认页点 Authorize GitHub Copilot Plugin;
- 回到 IDE,看到确认提示后点 OK。
公司用 GHE.com 托管账号的,登录前要先改一项设置,见官方的《Using GitHub Copilot with an account on GHE.com》。
步骤三:补全、Chat 与 Agent
补全:正常写代码即可,灰色建议出现后按 Tab 接受。从上图的菜单能看到,Tools → GitHub Copilot 里可以对全部语言或当前语言停用补全(Disable Completions / Disable Completions for 某语言)。
Chat:在侧边栏或菜单里找到 Copilot Chat,直接提问。它能看到你当前打开的文件。
Agent 模式:
- 点 Copilot 图标打开聊天面板;
- 在面板顶部点 Agent 标签;
- 输入任务。Copilot 会在编辑器里流式给出修改、更新工作集,必要时建议终端命令;
- 查看修改;对它建议的命令逐条确认是否允许运行,之后它会继续迭代直到完成。
官方说 Agent 模式最适合三种情况:任务复杂、包含多步和报错处理;你希望由 Copilot 自己决定步骤;任务需要接外部系统(比如 MCP 服务器)。任务大或需求模糊时,官方建议先用 Plan 模式起草实施方案。
Agent 工作过程中可以继续发消息改变方向,也可以拒绝它提出的某条命令。
进阶:换模型、接 MCP、项目指令
- 换模型 / 自定义 Agent:提交任务前可以在聊天面板里切换模型,或选择为某类工作定制的 custom agent。Free 和 Student 档只能用自动选模型。
- MCP:Agent 的能力很大一部分来自工具,可以通过 MCP 服务器扩展,GitHub 官方提供了 GitHub MCP Server 用来在编辑器里操作 GitHub。
- 项目指令:仓库里的
.github/copilot-instructions.md会自动带进请求,见《copilot-instructions.md 怎么写》。
常见问题
Q:聊天面板里没有 Agent 标签?
先升级插件到最新版;如果是公司账号,可能是管理员在策略里关闭了 Agent 模式。
Q:登录时浏览器打不开或设备码过期?
重新点一次 Login to GitHub 获取新码;公司网络拦截 github.com 的设备授权页时需要找 IT 放行。
Q:一定要装这个插件吗?
不一定。官方说明插件提供完整的 Copilot 体验,但也可以通过 JetBrains AI Assistant 或 Copilot CLI 使用 Copilot,各入口的能力差别见官方《GitHub Copilot in IDEs》。命令行用法见《GitHub Copilot CLI 安装与使用》。
Q:会不会很耗额度?
官方说明 Agent 模式下每条提示都消耗 AI credits,长对话、跨大量文件的任务消耗更多;补全在付费档不计 credits。详见《GitHub Copilot 免费版与 Pro 区别》。
参考资料
- Installing the GitHub Copilot extension in your environment(GitHub 官方,JetBrains 标签页):https://docs.github.com/en/copilot/how-tos/copilot-in-your-ide/set-up-copilot/install-copilot-extension
- Using agent mode in your IDE(GitHub 官方):https://docs.github.com/en/copilot/how-tos/copilot-in-your-ide/use-copilot-agents/use-agent-mode
- Quickstart for using GitHub Copilot in your IDE(GitHub 官方):https://docs.github.com/en/copilot/get-started/quickstart-for-using-github-copilot-in-your-ide
- GitHub Copilot 插件页(JetBrains Marketplace):https://plugins.jetbrains.com/plugin/17718-github-copilot
0 条评论
还没有评论,来抢沙发~